Estimate of total time required for average computer user: 10 minutes.
If you are looking to get into cryptocurrency without risking a dime, you can use your existing work and home computers to mine cryptos while you are away from the computer.
Despite my criticisms of cryptocurrency, there’s no reason not to partake in the bubble if it comes at no cost. Don’t expect to make more than just a dollar or two a week with this guide. There are many optimizations left out that you can discover on your own if you wish to invest more time.
We will use Monero (XMR) for this guide. A property of an effective currency is that you can barter it privately. BitCoin fails in that respect in that transactions are traceable through the blockchain, whereas Monero obfuscates the transactions to grant users some privacy.
Step-by-step guide to mine Monero on Windows 10 (64-bit) automatically when you are away from your computer
Step 1: Get Monero at getmonero.org
Click here to download Monero. Install, run, and set up a new wallet.
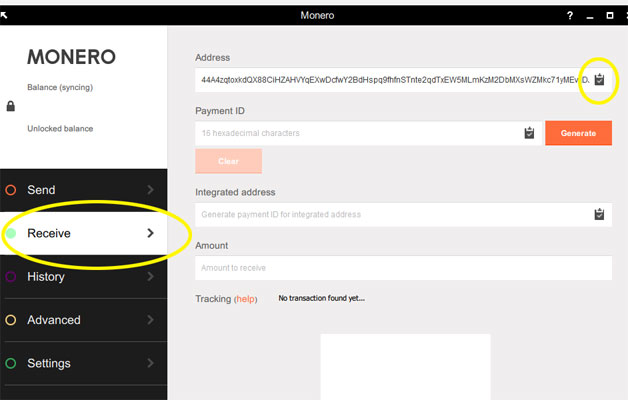
Step 2: Get your wallet address
Copy your wallet address by navigating to the “Receive” tab and clicking on the clipboard icon under “Address”:
Step 3: Download XMR-Stak-CPU mining software
If you want to know why you don’t want to use the solo mining feature in the Monero software, see footnote1.
Download and extract to any folder XMR-Stak-CPU no-tls version. See footnote2 if you have download problems.
If you have an NVIDIA graphics card, also download XMR-Stak-NVIDIA no-tls version. If you have an AMD graphics card, also download XMR-Stak-AMD.
April 6, 2018 Update: due to the Monero7 update, the two XMR-Stak programs above no longer work. Use the consolidated XMR-Stak instead. You no longer need to manually edit config.txt in steps 4 and 5 as running xmr-stak.exe will prompt you for the information instead. Furthermore, you should rename the exectuable and paths used in Steps 7 and 8 to reflect the new XMR-Stak.exe and xmr-stak-win64 path.
Step 4: Paste your wallet address into XMR-Stak-CPU’s config.txt
Go to the folder you extracted the files to and open config.txt in a text editor (e.g. NotePad).
Look for “wallet_address” and paste your wallet address from Step 2 into the right-side quotes like so3:
"wallet_address" : "44A4zqtoxkdQX88CiHZAHVYqEXwDcfwY2BdHspq9fhfnSTnte2qdTxEW5MLmKzM2DbMXsWZMkc71yMEvfjDJ13Ny8iHqw78",
Repeat this step for XMR-Stak-NVIDIA or XMR-Stak-AMD if you downloaded any of those too.
Step 5: Paste the default recommended CPU configuration into config.txt
Run XMR-Stak-CPU.exe. It will suggest a configuration which you should copy and paste into config.txt. For example, you will want to replace in config.txt:
"cpu_threads_conf" :
null,
with something that may look like:
"cpu_threads_conf" :
[
    { "low_power_mode" : false, "no_prefetch" : true, "affine_to_cpu" : 0 },
    { "low_power_mode" : false, "no_prefetch" : true, "affine_to_cpu" : 2 },
    { "low_power_mode" : false, "no_prefetch" : true, "affine_to_cpu" : 4 },
],
Repeat this step for XMR-Stak-NVIDIA or XMR-Stak-AMD if you downloaded any of those too.
Step 6: Open Task Scheduler
You can set up your computer to automatically mine Monero while you are away4.
Run Task Scheduler by hitting  +R and then entering “taskschd.msc”, or search through the Start Menu programs for “Task Scheduler”.
Step 7: Create a new task to run the miner software on workstation lock
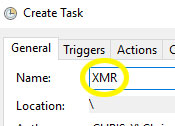
Go to “Action”/”Create task…”:

Name the task whatever you like:
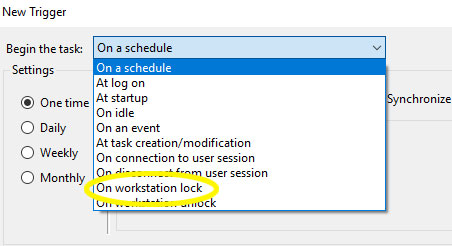
Go to the “Triggers” tab and hit “New…”:
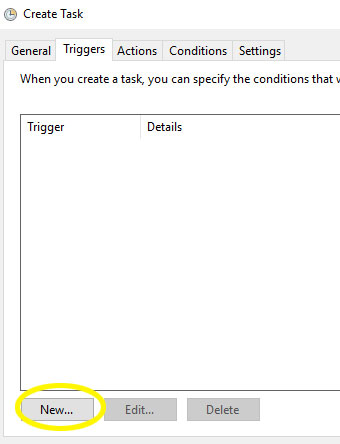
Select “On workstation lock” in the “New Trigger” dialog:
Click OK, then go to the “Actions” tab and hit “New…”, then enter in the location of XMR-Stak-CPU.exe. Also fill in the “Start in” field to match the folder path of XMR-Stak-CPU.exe and config.txt like the example below:
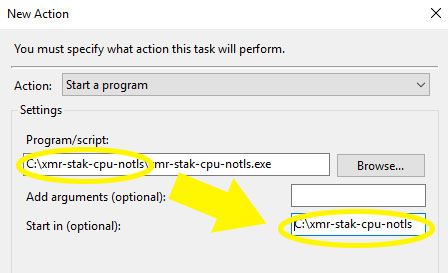
OK the “New Action” dialog. You can add another “New Action” if you want to also run XMR-Stak-NVIDIA or XMR-Stak-AMD.
OK the “Create Task” dialog.
The miner programs will now run every time your screen saver locks your computer or you manually lock it via +L4.
Step 8: Create a new task to close the miner software on workstation unlock
Follow the same basic steps from Step 6 to create a new scheduled task, except choose “On workstation unlock” for the Trigger and use
taskkill /f /im "xmr-stak-cpu-notls.exe"
for the Program/Script in the “New Action” dialog.

When you OK the “New Action” dialog you can say “Yes” to the prompt asking if you want to run “taskkill” with arguments.
You can add another “New Action” if you want to also kill “xmr-stak-nvidia-notls.exe” or “xmr-stak-amd-notls.exe”.
OK the “Create Task” dialog.
The miner programs will now terminate every time you unlock your computer.
Fin.
* * *
If you appreciate this guide, consider a donation or support my other work.
Monero donations welcome to wallet address:
44A4zqtoxkdQX88CiHZAHVYqEXwDcfwY2BdHspq9fhfnSTnte2qdTxEW5MLmKzM2DbMXsWZMkc71yMEvfjDJ13Ny8iHqw78
Footnotes
1The Monero application gives you the ability to mine solo under “Advanced”. However, you will likely not have enough computing power to discover a “block” and earn Monero on your own (at least on a regular basis).
For that reason, you will want to download optimized mining software that will contribute to a pool. When the pool discovers a “block”, the Monero earned is divided proportionally amongst the contributors, with a small commission usually set aside for the pool operators and mining software developers.
2If your downloads are blocked by Chrome, try downloading them in FireFox.
If your downloads are blocked by Windows Defender or other malware detector, disable them temporarily.
3You can also fill out the “pool_address” with a different pool address if you want to choose a pool geographically closer to you and with smaller commissions. See moneropools.com for a list of mining pools.
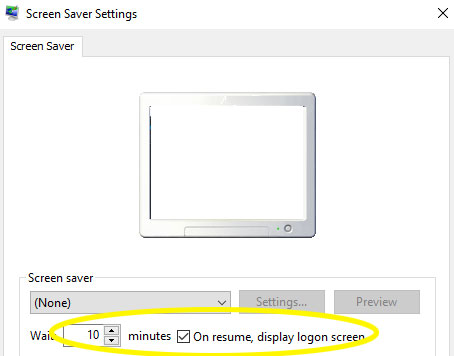
4If your screen saver displays the lock screen on resume as depicted below, then when you are away it will automatically trigger the task created in Steps 6-8 after the wait period is reached. Otherwise, you can manually lock your computer every time by hitting +L.